Sunday, September 7, 2014

Sketch Challenge at ODBD


Hello all!  I have not been posting (or even on my computer, for that matter) for quite a while. My computer has been down with blue screens and crashes. It drove me crazy, but I am happy to say that I finally fixed it ALL BY MY LITTLE SELF! Lol.  I am kind of proud of myself for doing that, too - can't you tell?  Big Smile.  Anyway, I am in a hurry because I got everything fixed in time to make a card for the latest challenge at Our Daily Bread.  This time they had a sketch challenge. Here is the sketch:


Sometimes I have trouble with sketch challenges, but I was pretty happy with the way this one turned out. The image I used is from ODBD.  It is from their Cat Sympathy Set. I love the kitty image. I colored it with Copics and cut it out with a Spellbinders Scalloped Oval Die,  The little sentiment came from ODBD's Rose Bouquet Set.  Here is my card that I'm posting at the very last minute! Thanks so much for stopping by my blog!


Friday, July 11, 2014

FAIRY BRINGING FLOWERS


Good morning everyone!  I am so happy that everything worked out, and I am actually back here posting as quickly as I had hoped! However, I am not saying another word about that - just gonna count my blessings ONE day at a time. Lol.  So today I have a card I made using a really pretty fairy image from Wee Stamps called Spring Bringer.


 I love this stamp. I have actually had it quite a while and have made several cards with it. It is so pretty in any color palette you choose. The stamp is designed by Sylvia Zet and is now available as a digi. I don't THINK that was the case when I bought it. If you are interested in purchasing the digi version or any other of Sylvia's adorable digi images, click on this link HERE.

 I colored the image with my Copics, but I used Smooch inks on her wings to give them that soft, glittery look that Smooch gives. I cut the image out with Spellbinders Radiant Rectangles. The sentiment came from the FELICITY rubber stamp set, which is part of Angelica and friends Collection from Crafter's Companion. I also used a Spellbinder's die to cut out the sentiment, which I popped up with foam tape. I added some bling and some little roses from my stash.  I adhered the Radiant Rectangle with foam tape to a background I made using gesso, gelatos, and glimmer mists in various colors, along with some beaded medium. It was so much fun playing with all the different textures and colors to get the background! I hated to cover it up at all. Here is a closeup. Sorry I didn't think to take the pic before i adhered everything to it!


If you have any questions about the background, please leave your question in the comments. I will get back to you as soon as I can. If you haven't tried playing with a mixed media type page, you really should. You can get really creative making textures with all sorts of things lying around your house. It's a good way to see what colors and what type of inks, paints, mists etc. blend well together. Make notes about what you used, and then you'll have the info for future projects!

I am entering this card in the following challenges:
Allsorts Challenge Blog - Fairies
Pile It On - Add Flowers
Aud Sentiments Challenges - Anything Goes plus DT call!

Thanks so much for stopping by my blog. Please leave comments - I really appreciate it!


Saturday, July 5, 2014

SUMMER "BESTIE" CARD

I hate to make such a quick post after taking such a long "leave of absence" from my blog, but I spent the day (and night) with 4th of July activities that were so much fun that I lost track of time, and one of the challenges I am entering will be closing shortly. So here is the card I made for 3 Summertime Challenges:


I just love the image I used for this card. She is a digi made by Sherri Baldy and called "Bloomin Garden Bestie". I love all of the Bestie images, and this is one of my favorites  I printed her on white cardstock, colored her with Copics, then fussy cut her and used foam tape to adhere her to yellow cardstock.  I took this panel along with some clouds I fussy cut from some dp in my stash and adhered these to Graphics 45 designer paper from the Secret Garden collection. I also added some bling, butterflies, and butterfly trim from my stash. I punched out more yellow cardstock and adhered glitter letter stickers to it for the sentiment, which was adhered with foam tape. Finally, I added two paper flowers that I made myself. I was pretty happy with how they turned out. Here is a closeup:


I actually call these paper roses. I made them using dp from my stash that I diecut using the Tim Holtz Alterations Tattered Flower Garland die. If you would like any information about how these are made, please feel free to ask in the comments. They lie more flat than other flowers I have made like this, and so are much better for using on cards - especially if they are to be mailed!  The edges of these were inked, and I finished them with a glitter spray. The camera doesn't do justice to the subtle shine from the spray I used. Sorry I don't have time to look for specific info, but again, please ask, and I will get back to you as soon as I can.

I am entering this card in the following challenges:

My Besties Challenge Blog  - Summer Days

Fussy and Fancy Challenge - Summertime

Pile It On  - Outdoor Fun


Thanks so much for stopping by my blog! I hope to be back on a regular basis - but that's ALL I'm going to say. Lol


Saturday, June 29, 2013

If you haven't heard, Google Reader will be shut down on July 1, 2013. If you follow me on Google Connect, you need to find another service to keep getting updates of your favorite blogs. If you would like to continue following this blog, please click on the Bloglovin Button on my sidebar  or on the link here: Follow my blog with Bloglovin. I know I haven't posted much (to say the least!) lately, but this should be changing this weekend. I've had many plans in the works, and now I'm ready to start sharing with you again! So I do hope you will bear with me and continue to follow my blog! I do want to share a card I made for a friend's dad who is a fan of all things western and of the movie, Tombstone. Actually, I didn't know where I would find some of the images I needed, but Doodle Pantry came through for me! They had the perfect images! I really love their digis! Go by and have a look at their store. So here is the card:


Sorry I didn't have time to crop the picture. The gun and the quote at the bottom are from  Doodle Pantry. To tell the truth, I didn't even know that the quote was from Tombstone or what it even meant until my son told me! lol  The star is from a stamp in my stash that i stamped, heat embossed and cut out. The alpha for DAD was also in my stash, and the western paper with the hat and boots is from Paper House.  I thought both went perfectly with the western theme. I added some gold stars and some thick string that I attached with a wire. I was pretty happy with the way that turned out! I just have to show you the inside of the card, too.


The saddle is on the top half of the card when it's opened. I just had to put is somewhere! I thought it was so cute! It's an image from Doodle Pantry, which I printed, colored with Copics and cut out. The bottom half of the card has more paper from Paper House, with the cowboy sentiment from Doodle Pantry and Father's Day stamps plus a red star brad from my stash. 

Thanks so much for stopping by. I will be back soon, and I hope you will too!


Sunday, March 24, 2013


Spring Has Sprung! (Rumor Has It)

I cannot believe it has been so long since I have posted anything at all to my blog! I would start explaining the reasons for this terrible negligence, but I can't even remember that many excuses!  So I will just act like this never happened and go on my merry way.  Today that means that I am posting a card for Our Daily Bread Designs current challenge which is about Spring, AND the stamps used are to be ODBD stamps.  I was so happy to make a card about Spring. It is spring here in East Tennessee, of course, but you sure could have fooled most of us!  So a spring card may help cheer us all up!

The lovely sparrow image and the sentiment is from the ODBD set Sing To The Lord.  I just love this set! I colored the image with Copics, cut it out with Spellbinders Scalloped Circles die, and used Baby Blue Stickles around the edges. I added some flowers and bling from my stash. The base card is white with some lovely pastel pink, blue, and green flowered dp adhered. You can tell I love my embellies! I added some lovely pale ribbon roses and pearls to the base of the card, stamped the sentiment using Distress Ink on cardstock that I had sprayed with Glimmer Mist.  The top of the card has a brad bar that I have had FOREVER, but it seemed just perfect to attach the blue lace that runs down the middle of the card. I adhered my die cut image with 3D foam, and finished up with some blue gemstones, pink pearls, and a couple of butterflies from my stash. Whew!  That's a lot of bling, I know! lol

Thanks so much for stopping by my blog. I hope you will go by Our Daily Bread Designs and have a look at the amazing inspiration from the DT and all the other entries! 

Have a blessed day!

Lynn

Tuesday, January 24, 2012

Happy Bird Thank You Card

Oh my goodness. I am almost embarrassed to post - it has been so long! At least I can honestly say it was on purpose. I was so busy making things to sell or give as gifts for Christmas that I decided to focus on only that for a while.  Since then, I have had some pretty serious dental work, and I definitely wasn't in the creating mood!! Now things are back to normal (ummm.......as normal as they can be in my life! lol).

So this will be a very quick post. I made a thank you card for a wonderful friend who gave me a fabulous Christmas gift of  subscriptions to 2 magazines I love. How sweet was that?! So I remembered that I had this darling HAPPY BIRD digi stamp that was a freebie from Doodle Pantry.  It turns out that this week the theme of their challenge is to simply use one of their images! So I am trying to post this quickly, because I have to get this in on time! So here is my card:

                                                                      
Isn't this birdie adorable?  The designer cardstock is from My Mind's Eye "Fine and Dandy Girl" collection. The diecut is a Spellbinder's Nesties Label. I directly inked it with several pink inks that I played with until I got what I wanted.  I printed the birdie, colored with Copics, cut out, and attached with Popdots. The sentiment is from My Sentiments Exactly. I stamped it on a diecut in my stash, and attached it with 3D Dots too.  The "so happy" phrase is from one of the Lost and Found Two sets. I distressed and inked the edges of the dp and added some rhinestones for some bling.

Now here is the inside of the card, which finishes it off perfectly for my friend.

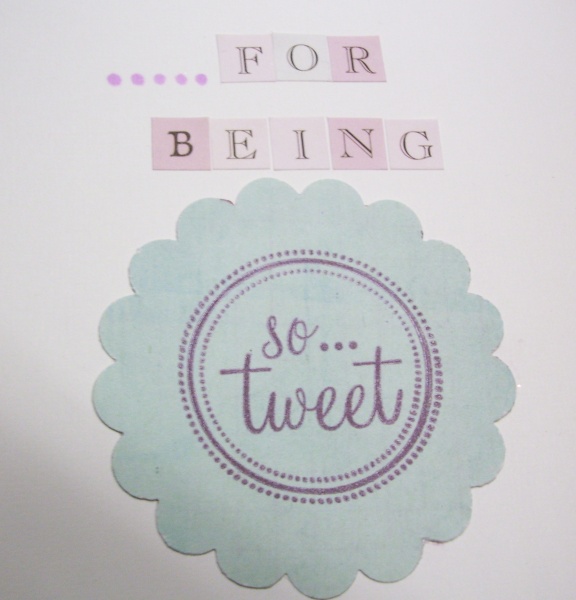
The "for being" are alpha stickers from my stash, and the "so tweet" is a cute little individual stamp from Snag 'Em Stamps.

I hope you like this card. As I said, I am entering it (at the last second!) to Doodle Pantry Challenge 19.  They have the cutest stamps there. I am going to frequent their shop, no doubt!  Thanks for stopping by, and I will be back much more quickly this time!


Wednesday, October 19, 2011

Time for Perfect Sentiment's 3rd Challenge Reveal!


Well ladies, last night was the deadline to enter last week's challenge at The Perfect Sentiment. We had so many lovely entries of Friendship Cards that were based on the amazing inspiration picture.  Don't forget to check back Friday to see who was chosen as The Perfect 3 and who won the random drawing.  It will be soooo hard to choose  The Perfect 3 - that's for sure!

Now on to this week's challenge! You are to make a Get Well Card (or a card that expresses this in some form or fashion). The twist (Remember, there's always a twist on our challenges!) is to use some type of embossing on your card. You may do dry embossing or heat embossing or even both!
If you like embossing, this is the challenge for you!

Plus, this week, besides having the chance to be chosen as one of  The Perfect 3 and posting that badge on your blog, we also have a sponsor who is giving a prize to our random drawing winner!
This week Sarah from My Little Somethings  is giving away a grab bag of various crafting items with a minimum value of $15. Whooohoooo!  Now that's a nice prize. If you get a chance, stop by Sarah's blog and thank her for her generosity!. Sorry -  USA participants only for this prize, due to the high cost of shipping internationally. 

  Here is what I came up with for the challenge:


My image is a digi that was created by my friend, Sam Erozan, who is a very talented artist. We considered going into business together selling his digital stamps, but things didn't work out that way. I do have several of his digis, and I love them all. I decided to use his "Fairy Dog" as a "The Get Well Fairy"!  lol  I generated that part of the sentiment on my computer,  and printed it and the image. I colored the image in bright, cheerful colors, using pencils, Copics, and Stickles. I printed the sentiment on pink cardstock that I had dry embossed with the Sizzix Impressabilities "Flourish" embossing plate. The rest of the sentiment, at the bottom of the page, was created with a rubber stamp from a My Sentiments Exactly set onto the same embossed paper. Each of the 2 parts of the sentiment were then punched out, and I inked the edges.
My base card is yellow (obviously!), with a layer of pink dp from my stash. On top of that is a blue cs from my stash, and I dry embossed this also. This time I used the Sizzix Textured Impressions Embossing Folder in "Starry Night".  I used a Martha Stewart punch on the top of this, distressed the edges of the pink and blue paper, and inked the edges of the blue embossed cs using Distress Ink. I added some pearls and pillow butterfly stickers from K & Co.
I do like to use Bible verses on my cards whenever possible, so I used a stamp from Our Daily Bread Designs on the inside of the card that says "A Cheerful Heart is Good Medicine; Proverbs 17:22" and underneath that is a simple "Get Well Soon" stamp from My Sentiments Exactly.  I thought that the Get Well Fairy was so cute and funny that it would be good medicine for anyone who needed to get well!  If you would like to see lots of inspiration for this challenge, here are the links to the blogs of everyone on the DT.  You can see their cards at The Perfect Sentiment Blog, but if you go to their blogs, you can get some ideas about how they made their cards. If you are like me, I am always interested in seeing how someone made their creation.


Jan’s blog
http://www.tweetybugshouse.blogspot.com/

Kimberly's Blog
http://hellocutiecrafts.blogspot.com

 Paper Expressions  owner
Jennipher’s Blog
http://www.jennipherlowery.com

Rochelle's Blog
http://www.twotearsinmybucket.blogspot.com

Samantha (DT Coordinator)
http://kania-amusestudio.blogspot.com/

Sarah's Blog
http://my-little-somethings.blogspot.com/

Shelly’s blog http://www.geminivisionsart.blogspot.com


Stacey's Creative Corner
Stacey's Blog
http://staceyscreativecorner.blogspot.com

Theresa’s Blog
http://thepaperpeasant.com

With All My Heart
Tere's Blog
http://www.tereazua.com

 Shaunna’s Blog
http://shaunnarooskie.com

ScrappinAbby
http://scrappin-abby.blogspot.com/


I hope you have been inspired to join in our challenge this week.  Remember, you  have until Tuesday at 10:00 p.m. to get your entry in. We will be choosing winners and posting them the following Friday.   Also, please remember to link your blog post with your entry directly to our blog, and use keywords PSC03 this week. Thanks so much for stopping by my blog. Please leave comments and let me know what you think about my Get Well Fairy!


Wednesday, October 12, 2011

Time for the 2nd Challenge from The Perfect Sentiment!

Oh ladies, I hope you all had a chance to stop by The Perfect Sentiment Challenge Blog this past week, even if you didn't join in the challenge. If you did, you saw some gorgeous inspiration cards by the DT along with some awesome entries for our first challenge. You have to go by and see who got chosen for out Perfect 3 this week, and to see who won the prize from the random drawing! I'm not even telling you who, because I want you to click on the link above or on my sidebar and have a look!  Besides, you simply HAVE to stop by today, as we unveil our SECOND CHALLENGE!!  Whoooohoooo!

Our second challenge is another one that I know you will want to enter - Friendship Inspiration!  We would like you to make a card having to do with FRIENDSHIP, and we want you to use colors inspired by this awesome photo that Jennipher found:


Wow, aren't these just yummy colors?  I love them.  Here is the card that I was inspired to make from the colors in this photo:

                                                                                                                                               
I had some trouble with the lighting on this, but my dp really is the same teal color as the Maya Road Ribbon that I used at the bottom. I love, love, love that ribbon. I wish I had it in every color. It kind of looks like it overpowers the card in this pic, but it really doesn't. It has to do with the angle of the card in the photo, I think. My base card is made from teal cardstock that I cut to the 5 1/2 x
5 1/2 size that I make so often. I then used some gorgeous paper from My Mind's Eye "Lost and Found Two" Collection. I was really inspired by the photo, because I wasn't only thinking of color, but I was thinking of the layers of the covers. So my next layer is some yummy chocolate cs with brown hearts on it. I distressed the edges of both of these layers. Then I got to cheat, because the frame (including the birdie) was cut out from the MME dp. It even had the teal glitter on the edge of the frame! How cool is that?   I then stamped the sentiment (from Our Daily Bread Designs Friendship Set) in brown Inkadinkado Ink onto cream colored Neenah Paper, and I heat embossed it with Ranger Clear Embossing Powder. I simply adhered it to the back of the cut out frame and added the little flower embellie from my stash. I added a brown photo corner from my stash and a Prima flower to one corner and teal self-adhesive pearls to the other. Finally, I added layered a light blue heart rub-on over a  brown background rub-on, both from Pink Paislee. Oh yes, can't forget the Teal Stickles! lol    Here is a close-up so you can see the glimmer a little better:

                                                                                
Now that you have seen my card, here are the links to the blogs of the other members of the DT. Go by their blogs, and you will REALLY see some awesome cards to inspire you:

Jan's blog
http://www.tweetybugshouse.blogspot.com/

Kimberly's Blog
http://hellocutiecrafts.blogspot.com/

 Paper Expressions  owner
Jennipher's Blog
http://www.jennipherlowery.com/

Rochelle's Blog
Two Tears in my Bucket
http://www.twotearsinmybucket.blogspot.com/

Samantha (DT Coordinator)
Crafty Couple's Corner
http://kania-amusestudio.blogspot.com/

Shelly Kane's blog
Gemini Visions Art
http://www.geminivisionsart.blogspot.com/

Stacey's Creative Corner
Stacey's Blog
http://staceyscreativecorner.blogspot.com/

Theresas Calderini's Blog
The Paper Peasant
http://thepaperpeasant.com

With All My Heart
Tere's Blog
http://www.tereazua.com

 shaunnaRooskie's Blog
http://shaunnarooskie.com

ScrappinAbby
Paper crafting blog
http://scrappin-abby.blogspot.com/

After seeing all the inspiration at all of the blogs of these talented ladies,  here is something else to inspire you to play along with us this week. We have a super sponsor! Heart Song Designs is giving a digi from their gorgeous collection to the lucky winner of our random drawing!    Stop by their shop and have a look at their awesome digis. That way, in case you are the winner of the random drawing, you will be know what you want! lol  Ummmm, I have a feeling you will be wanting many more of their lovely creations. I know I do!

One more bit of important info. You now have until Tuesday at 10:00 p.m. to get your entry in. We will be choosing winners and posting them the following Friday.  So get your entry in by Tuesday night, then check back on Friday to see if YOU may have been chosen as one of  The Perfect 3 or perhaps won the random drawing.  Please remember to link your blog post with your entry directly to our blog, and use keywords PSC02 on your blog or if your post elsewhere this week.

I know this has been a long post! Thanks so much for stopping by my blog. I sure hope to see you this week at The Perfect Sentiment!                   


Wednesday, October 5, 2011

The Perfect Sentiment Challenge Blog Launches Today!

Good morning everyone! I have lots of exciting news today!  First, I had mentioned that Jennipher Lowery was starting a new weekly challenge blog called The Perfect Sentiment, and she was looking for a DT. I haven't had a chance to post the news that she now has her DT, and I have been chosen to be a Senior Designer on the Executive Design Team for this exciting new blog!!!! WHOOOO-HOOOOOO!  You may have noticed the badge in my sidebar - that was a clue! lol  Can you tell how happy I am? : )  Jennifer and Sami, who is also on the Executive Team and is the DT Coordinator, have done a fabulous job chosing several very talented ladies for this team. Not to mention that they are so talented themselves! You will be truly inspired, I know.
Soooooooo.........drum roll please.........the next big news is that The Perfect Sentiment Challenge Blog officially begins today, October 5th. I am loving the first challenge, PSC01, which is to make a Sympathy Card, and the twist is - it must have lace of some type on it.  This is how all of the challenges will run.  Each Wednesday, you will be challenged to make a type of card - Sympathy, Get Well, Missing You, and who knows what else, but you will be given an added "something" to challenge you.  Doesn't that sound like FUN?!!!  Yep! lol

Every week that you enter, your card might get picked as one of the Perfect 3! Click on the PS Challenge link above and have a look at the lovely badge you get to post on your blog if your entry gets chosen for this honor.  To top it all off, we are proud to say that we have a sponsor for our very first week!    Our sponsor this week is GLITTERBABE DIGIS.  Stef, the owner, has been extremely generous and is offering a $10 gift certificate to her store if your name is drawn. That is enough to buy 3 of her fantastic digis!!  Click on her shop name above and have a look at her lovely images. You will want some!!!
So here is the card I made for PSC01 using one of those beautiful digis:


For those of you who may not know me, you may be surprised when I say that for me this card is actually on the CAS side! I decided not to load it up with my usual embellies and bling since it is a Sympathy Card, although everyone may not feel this way at all.   Notice that you don't have to use the word "Sympathy" in your sentiment.  I used a sentiment stamp that conveys sympathy from Our Daily Bread Designs. I stamped it with pink pigment ink and heat embossed it with Ranger Clear Embossing Powder. The paper I stamped it on is a piece of cardstock that I colored using the "shaving cream with alcohol ink technique".  It is hard to see the paper in this picture, but it has all the colors that are in the rest of the card. If anyone is interested in this technique, let me know and I will post a tutorial. I adhered my sentiment to a rosey-pink cs, then adhered the whole thing with 3D Dots over my lace ribbon (There's my lace requirement!), which also has Prima flowers glued to it.  The pretty striped dp is from Sassafraslass, and I used an EK Success border punch on the bottom. I adhered this to a 5 x 7 blue card base.  The lovely waterlily I used is (as I mentioned) one of Glitterbabe's lovely digi's. I printed it out on Neenah paper, colored it with a combination of Copics, Prismacolor Pencils used with Googone (I use Googone instead of Mineral Spirits all the time - are you familiar with this?), Smooch, and chalks for the background. I use a Spellbinders Label Nestie to cut it out, and to cut the rose Little Yellow Bicycle cs under it. I inked the edges of both of these and adhered these both with 3D Dots for dimension. I finally added some flat-backed pearls in each upper corner. I can't help it - I always have to have a pearl somewhere!

I hope you will join in our challenge! Get started with us right at the beginning. Remember, link your blog post with your entry to THE PERFECT SENTIMENT CHALLENGE BLOG, and please use keyword  PSC01. Deadline for your entry is Sunday at 10 pm EST.
Also, if you decide to enter, why not stop by Stef's blog, GLITTERBABE GREETINGS, and leave her some love for her generosity to us.

As I mentioned, when you stop by the PSCB, you will definitely be inspired by the DT. There are links there to all the blogs, but for your convenience, I am going to list the DT blogs here also, just to make it easy for you to stop by. I promise you will be inspired! Here they are:

Jan's blog

http://www.tweetybugshouse.blogspot.com/


Kimberly's Blog
http://hellocutiecrafts.blogspot.com/ 


Paper Expressions
Jennipher's Blog (owner)
http://www.jennipherlowery.com/


Rochelle's Blog
Two Tears in my Bucket
http://www.twotearsinmybucket.blogspot.com/


Samantha (DT Coordinator)
Crafty Couple's Corner
http://kania-amusestudio.blogspot.com/


Sarah's Blog
My Little Somethings
http://my-little-somethings.blogspot.com/   
 
Shelly's blog
Gemini Visions Art
http://www.geminivisionsart.blogspot.com/


Stacey's Creative Corner
Stacey's Blog
http://staceyscreativecorner.blogspot.com/


Theresa's Blog
The Paper Peasant
http://thepaperpeasant.com/


With All My Heart
Tere's Blog
http://www.tereazua.com/


Shaunna's Blog
http://shaunnarooskie.com/


ScrappinAbby
http://scrappin-abby.blogspot.com/                                                                


I hope I didn't leave anyone out! I also hope to see your creations at The Perfect Sentiment! Thanks so much for stopping by my blog. Let me know what you think about any of this - including any questions or ideas about my card.  I love to read your comments!


Tuesday, September 13, 2011

A "Beary" Special Angel

I'm so sorry I haven't posted in so long! You know how it is when real life interferes with your crafty time! lol Anyway, today I have a card to share with you that I am entering in several challenges having to do with backgrounds, layers, and things of that nature. I believe this one will fit.


This darling Angel Bear is a digi stamp from I Brake for Digis. I printed it, colored it with Copics, colored the wings with Smooch Pearlized Accent Ink in Shabby Pink, and cut it out. The original digi has a cute little bee flying around it, but I cut it off for this card. The other stamp I used is the sentiment stamp which is from Our Daily Bread Designs "Friendship" set. I love this sentiment, and use it quite often!
One of the challenges I am entering this card in is from Joan's Gardens, which is new to me. Joan has a wonderful store, plus she and Selma have a challenge blog that they have taken a break from for a few months. This month they are starting their challenges again, so I am entering challenge #1. They have quite a recipe for this: use 2 different dies & 2 DIFFERENT embossing folders to create a background,  a sentiment and pearls. So I used Basic Grey Phoebe dp on my 5 x 7 base card, then I layered pp that I made using the shaving cream and alcohol ink technique (I have so much fun making my own pp with this technique! If anyone would like instructions, let me know and I'll post a tutorial.). Before adhering my "shaving cream" layer, I embossed it using Sizzix Impressabilities "Flourish" die, plus I used a Martha Stewart border punch on the right side. I added a piece of crocheted teal ribbon at the bottom of this piece. Next I took a piece of blue scrap paper and embossed it with the same "Flourish" Impressability. I sanded it slightly, so that the embossing would show. I used a Spellbinder's Nestie Oval to cut this piece out.   So next I took a teal piece of scrap paper, and to follow my recipe correctly, I embossed it with a Sizzix Textured Impressions Embossing Folder in "Starry Night", slighly sanded it, and used a Spellbinders Long Rectangle Nestie to cut it out. Btw, the Textured Impressions Embossing Folder REALLY makes a strong impression on your paper. If you haven't had much success with embossing folders, give this one a try!
After inking the edges,  I adhered my two diecuts with 3D dots for dimension, then adhered my Angel Bear with 3D dots for even more dimension. So I have lots of layers, which is what the Pile It On Challenge is about this week, so I am entering it, too. Also, I Brake for Challenges is about backgrounds. I have really worked on the background for this card, so I am entering their challenge also. Plus I got my cute digi from them, after all. : )
So that you can see some of this better,  here is a closeup:


I think you can see the embossing fairly well in this pic, as well as that cute digi.  Next, here is a pic of the sentiment that I stamped, heat embossed, and distressed the edges before adhering with 3D dots. You can see some of the embossed shaving cream paper, too.


I always tried to give you a good view of what the shine you get with the Smooch on the wings. You may be able to see it better here:


I love the Smooch! How perfect for angel wings! I also used it on the halo.
I finished off the whole card with a small rose that I embellished with some Pink Stickles. Plus I added a small piece of paper flower ribbon at the top of the page, a pillow butterfly and some teal pearls.
I hope you like my layered card.  Besides the challenges I have already mentioned, I am also sending it into Stamp Something for their VERY LAST CHALLENGE! They have been around a long time, and I hate to see them go. They have provided all of us with so many great challenges and so much inspiration. Their challenge to say goodbye to us is Anything we want,  so I think I've met that! lol

Before I go, I want to add that my friend and former DT member, Jennipher Lowery, is starting a brand new challenge blog soon. It is called The Perfect Sentiment, and I am so excited about it. She is currently looking for DT members. Click on the link here or in my sidebar to find out more. Plus, I will be writing more about it soon. This post has been so long, I think I'd better wait until next time to say anymore! lol Thanks so much for stopping by my blog!


Tuesday, August 23, 2011

A Vintage plus Black for 365 Cards' Vintage Week

I am making a really quick post. I have been watching the 365 Cards Challange Blog this past week, and each day the challenge was to make a vintage card plus a particular predominant color. Even though I have been really busy, I was SO SURE that I would get at least 3 or 4 of their challenges done. I have been cruising by Gloria Stengel's blog to look at her awesome entries, and she is giving the fab prize for the name drawn from vintage week. I would tell you all about it, but I did NOT have the time to make several cards. I managed to do one card - vintage plus black as the main color. However, entries are supposed to be in tonight, so I need to get this posted! I may already be too late, but I did have fun making it. Here it is:


I started with a black card base, then added some Rhonna Farrer dp from my stash. Then I found some real vintage music from my old piano bench, adhered 2 pieces that I tore out of a music book (plus the title of a musical piece which I used as my title - "Flower Song"), and took a dry brush and swiped gesso over it all to sort of bring it all together. I used a scalloped punch to cut a piece of cream cs, inked the edges, added some little flower stickers and gemstones, then adhered it with 3D dots for dimension. The birdie was cut from a book I have of vintage silhouettes. I added some black and frosted stickles to it, plus a pearl for the eye. To finish, I added some lovely Prima pearl swirls. I love those. I could just put those on everything! lol
So I HOPE that I finishied this in time to add this to 365 Cards Vintage plus Black challenge, as I previously mentioned. We shall see. Be sure and go and have a look there. So much inspiration! Thanks for stopping by my blog!
                                                                             

Have a blessed week,
Lynn

Monday, August 15, 2011

Yet Another Christmas Card - Christmas Joy

Hello all. It's been tooo long since my last post. Before I share today's card with you, I want to tell you that I am so excited about the last layout I created in memory of my awesome mom (2 posts down). I am excited because I entered it in Our Daily Bread's Let Your Light Shine Scrapbook Challenge, and I was so honored to be the Let Your Light Shine Award Winner for that month! You can read all about that here, and of course, I now have my award posted in my sidebar. I was so pleased that it was a layout about my mom that won. SHE deserves the award! : )  OK, I could go on and on, but I promise I won't. Just had to share my excitement with you, but now on to today's creation......

Last post, I made a Christmas card using a lovely stamp from I Brake for Stamps. I have several lovely Christmas stamps from them, and I love them all. I wanted to make a card using one of their images again, which means that I made another Christmas card. I need to get started on them, after all! I was pretty happy with this one, especially the sparkle that I was actually able to capture on my camera to some degree.  Here's the card:


I swiped some white acrylic paint onto some green dp in my stash, cut it out with Spellbinder's Nesties Label 4, inked the edges with CTMH White Daisy Ink, and raised it with 3D Dots. I arranged some gorgeous Prima pearl swirls onto the card, added 3 more pearls in the upper right corner, plus a snowflake  and ribbon from my stash, and a "Joy" tag from K & Co which I altered a bit. I also wrote the word "Christmas" with a white gel pen on cs, inked the edges, and adhered it to the ribbon. The poinsetta image is from I Brake for Stamps, as I mentioned previously.  Here is a closeup:


You can see the shimmer, but it has even more shimmer irl! I stamped the image with black pigment ink and heat embossed with clear embossing powder. I know that everyone advises not doing this with Copics, but it helps me to stay in the lines! lol  I just have to be careful to try to stay away from the ep. So far it works for me!  I colored the poinsettas with Copics RV02, R83, and R85. I then went over that with Smooch - 2 shades of pink and a white frosted top coat (actually, it's almost clear with just a frosty shimmer that's SO PRETTY) called Illuminate. I LOVE the Smooch Pearlized Accent Inks and wish I had all of them! I especially like the Pearlized Top Coat, Illuminate, as you get a very glimmery look without going all out and using glitter. I used it to touch up the snowflake from my stash, so that it would match the pink and green theme.  It's so pretty and so EASY. Maybe "easy" is why I like Smooch so much! lol  Oh, and btw, I colored the leaves with 3 shades of Copics also, and used a shade of gold Smooch in the center of each flower. I then "fussy cut" the image and adhered it with 3D Dots to the label. Finally, here is a closup of the "Joy" tag:


I gave the pink side some extra gleem with a bit of Smooch, and edged it and made the swirls with Liquid Pearls. I then added some pearls and gemstones. I think that about does it.

I'm so glad you stopped by my blog. I would love it if you would leave a comment and tell me what you think. I am entering this card in 2 challenges:
The first is Sparkle Creations Christmas Card Challenges. They have Christmas card challenges every week! This week they want Christmas Cheer or any Christmas card. I am also entering another challenge site that is new to me. It is Fab and Funky Challenges, and this week their theme is "It's Christmas!".  Both of these are in my sidebar, in case there is a problem with the links.
Hope everyone has a wonderful week!


Wednesday, August 3, 2011

Christmas in July at I Brake for Stamps Challenge Blog

I Brake for Stamps now has a challenge blog (I'm  happy to say!), and this week's challenge has been to make a Christmas card. I was SOOOO happy to hear that, since most of the stamps I have from them happen to be Christmas stamps. I finally decided to use their "Cardinals on Holly" stamp. I hadn't used this one yet, and I just love the stamp, but every time I color a cardinal, it looks mean when I get finished with it! lol  Have a look:


I used the "Merry Christmas" stamp from the I Brake for Stamp Christmas plate too. I stamped it and heat embossed it with some slightly glittery embossing powder, which did not show up in this not so wonderful photo. I'm trying to get this in at the last second however, so I couldn't take the time to take a good photo.
Back to the card, the designer paper is from Cosmo Cricket. I used some other dp from my stash to make a tab behind the cardinal panel and to put a musical score at the top of the card. I figure birds sing, so I needed something musical in there! lol  I colored the cardinals and holly with Copics, and chalked the background with some pastel blue and green. I added a button, a piece of lace across the bottom of the card, some rhinestones, and a K & Co. 3D metallic flower next to the sentiment, which I tore out and raised with 3D Dots.
I better to hurry to get this in! As I said, I am entering this in the
I Brake for Stamps Christmas in July Challenge. There is a link to their blog on my side bar also. Thanks so much for stopping by my blog! have a blessed day!


Saturday, July 30, 2011

A Layout Remembering my Beautiful Mother with ODBD Stamps

July's Let Your Light Shine Scrapbook Challenge at Our Daily Bread Designs is to create a page using circles and your fav color (or a color from the photo you use).  ODBD stamps are to be used also. I LOVE ODBD stamps! I have a few sets, but there are SO MANY that I would love to have!!! Like.....all of them! lol  Perhaps I will get lucky and win the awesome $25 to use in their store. Of course that could be a problem, since it would take me forever to choose just one set. What a great problem to have......teehee.

Anyway, even if I don't win, I really enjoyed working on this layout of my mom. There are 2 photos on this page. One in particular is not the best quality, but considering that these are the originals from 1945, I think they look pretty good. The photos are of my mom at age 23 in her first MINK coat! Yes, mink. Now I am a big animal advocate, and I know that is not politically correct. In fact, my mom (who passed away in 2001) was also an animal lover and wouldn't have bought a real fur for as far back as I can remember, but I suspect things were different in 1945.  Before I go on, I suppose I could show you the layout! : )


The fav color that I used is a teal blue - don't know if you can tell how "teal" it is on various monitors, but I promise that irl, most of the blue in this lo is a teal shade - especially my circles. The circles in the title and under the birdie are chipboard that I inked with various shades, especially Brilliance Sky Blue, and then sprayed with "Glacier" Glimmer Mist for shimmer, plus it added to the teal color.
Here is a closeup of the title:


Wow - that doesn't even look teal on my monitor! Oh well, the chipboard letters in MOM are from Fiskars and K & Co. I wrote the other words on white cardstock, cut them out & adhered them to the chipboard. Obviously, I covered the heart with self-adhesive pearls.

My mom truly did have a merry heart. My childhood was often pretty crazy, due to the very serious problems my dad had that resulted in EXTREMELY abusive behavior toward Mama. She was always upbeat and even able to make jokes to lighten some really bad times. I attribute what sanity I have to her! (I know some of you may think that my sanity is questionable! lol) We were so close. I have missed her so much since she passed away. Here is a closeup of the photos. They were taken 10 years before I was born.


Below is the closeup of the stamp I used from ODBD's "Get Well" set:


                                                                              This panel is layered over a length of lovely blue lace from my stash. I did the stamping with brown pigment ink on cardstock that was dry embossed with the Butterfly Spellbinder's Impressability. I then heat embossed it with clear embossing powder. I did the same with the other stamp below the right photo, using ODBD's Praying for You set:


That scripture is so appropriate! I DO always thank the Lord for my mother, though she is now in heaven. Btw, you will notice that the circle theme is carried out by the circular rhinestones and the Fiskars punch that I used on both sides of the largest piece of  patterned paper, plus the other teal chipboard circle with a diecut birdie on it.  It is also carried out by this Colorbok diecut that I did a little journaling on:


I popped this up on 3D dots and added teal (Yes, irl they are teal!) rhinestones to it. Since I did not have much room for journaling, and I wanted to tell the whole story of this day for Matt, my only son, and for anyone else who might be interested after I am no longer around to tell the story, I typed a whole page of journaling and put it in the pocket I made underneath the photos. You pull out the page with the "Memories sticker that you see here:


I stamped around it with the flourish part of the butterfly with flourishes stamp found in the ODBD's Friendship set. I thought it looked weird to just stop the flourishes part of the way down, so I decided to stamp it all the way down! See:


I stamped it with brown ink, obviously. I rather liked the way it turned out! : )  Here is the whole journaling page opened:


Sorry for the poor pic! As you can see - I typed most of the page, then added my own handwriting, and ended it with another scripture stamp and dragonfly. This one is from ODBD's "Praying for You" set. You can see it more clearly here:


This verse was the perfect ending. Although the typed portion described my mom's day in 1945, the part that was hand written had a little about her death and missing her. What better way to end than to remind the reader that there will be no more death or tears in heaven! I hope my future grandchildren will feel the joy of knowing that when they get to heaven,  they will see Jesus and the great-grandmother they never had the privilege of knowing here on earth!

That's it! I added an inked Prima flower lots of Prima pearl flourishes. I think this might be the longest post I have ever made about one project! lol  Please forgive the length. Be sure and have a look at ODBD's July Let Your Light Shine Scrapbook Challenge, where I am entering this page. You will see lots of creativity on their blog, I promise!  
                                                        Thanks for stopping by!                                                             

Thursday, July 14, 2011

CASEing My Own Card to Make a CAS Card!

Well, I thought my title was just so cutesy, until it dawned on me that not everyone knows what CASE and CAS stand for! So much for being clever.......

Anyway,  in papercrafting, to CASE means to Copy and Share Everything. In other words, you find a card you really like, and you make one like it. For today's card, I CASEd my own card from my last post. I made my first easel card then, and I ended my post saying that I was starting on another one already. That's exactly what I did.  I was so pleased with my last card (especially the stamps I used on it from ODBD!) that I made another one a great deal like it, except that I made this one CAS - which is NOT my usual style!  CAS stands for Clean and Simple, btw. lol   Here it is:


As I said, I used ODBD stamps again. These are all from the Friendship Set. I used the same white base card and red cardstock for the front base as I did for my first easel card. The dp is also the same - from Sassafraslass. I simply flipped it over and used the striped side.  This already gave my card a more CAS look, so I kind of got the idea at that point. I tied the dp with the rest of my red dotted ribbon.  Instead of a doily like I used in the last card, I used a larger Spellbinder's Scalloped Oval cut from plain white cardstock. I stamped the lovely swirly butterfly on red mulberry paper again with CTMH White Dasiy ink, which I heat embossed with white embossing powder. This time I painted the edge with blue acrylic paint.  I used the same white ink and ep with the "Thank you for being my friend" sentiment. I think you'll notice that I do lots of heat embossing. It has to be my favorite technique - I love the look it gives!
The verse from Corinthians was stamped on a piece of cardstock from my stash with Brilliance Mediterranean Blue ink and heat embossed with clear embossing powder - of course! : ) I painted the cardstock with blue acrylic paint first, btw. So their is plenty of red, white and blue!  Here is a closeup of the inside:


I added a piece of the dp (turned in the other direction) to the bottom half of the inside before adhering the cardstock verse. Finally, I had to add a few pearls! That is as CAS as I can get! lol

I am entering this in the following challenges:

ODBD Shining the Light Challenge - red, white and blue
Pile It On - favorite technique

If any of the above links don't work for any reason, they are all in my sidebar. I hope you enjoyed my CAS CASE card! Thanks so much for stopping by.